中文(繁體字)
 English (international)
How to adjust your metal cutting bandsaw for optimum performance
Why You Should Tune & Adjust Your Metal Cutting Bandsaw
- Reduces Blade Wear
- Faster, Cleaner Cuts
Correct tuning and adjustment of your metal cutting bandsaw is essential to reduce blade wear and improve the accuracy of cuts. A properly tuned and adjusted metal cutting bandsaw is quieter, runs more smoothly and has a much longer life than a poorly adjusted machine.
Table of Contents
Tuning A Typical Small Workshop Metal Cutting Bandsaw
The approach to tuning your metal cutting bandsaw is very similar for all metal cutting bandsaws, here we will be looking at the process for tuning a small workshop metal cutting bandsaw with manual controls.
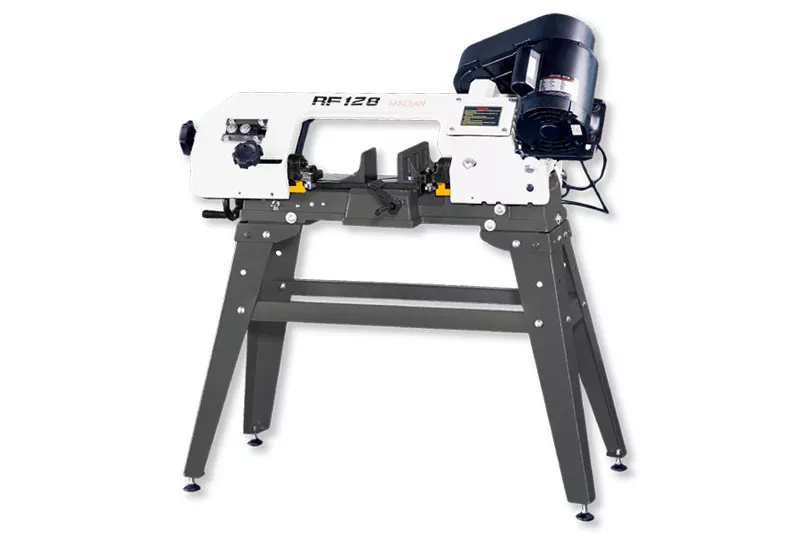
As an example the RongFu RF-128 is a typical high quality small workshop metal cutting bandsaw with a 5” cutting capacity for straight cuts (0 degree angle) through round stock, and 4½“ x 6” capacity for square stock.
This is a belt driven metal cutting bandsaw, and has two drive wheels that keep the blade in tension as it cuts. These are inside the upper housing cover and are driven by the belt drive. Speed is adjusted by changing the position of the motor drive belt on a series of pulleys.
Blade Guides Control Cutting Accuracy
When it leaves the cover, the blade passes between a pair of blade guides that control movement of the blade to reduce vibration and twist the blade to keep it cutting squarely and precisely as it moves through the workpiece.
Your Metal Cutting Bandsaw Adjustment Points
The diagram below shows the main adjustment locations on the RF-128 metal cutting bandsaw, and most small workshop bandsaws are very similar. The tension control knob (B) is used to keep the blade at the correct tension while cutting, but all parts need to be aligned properly for accurate cuts.
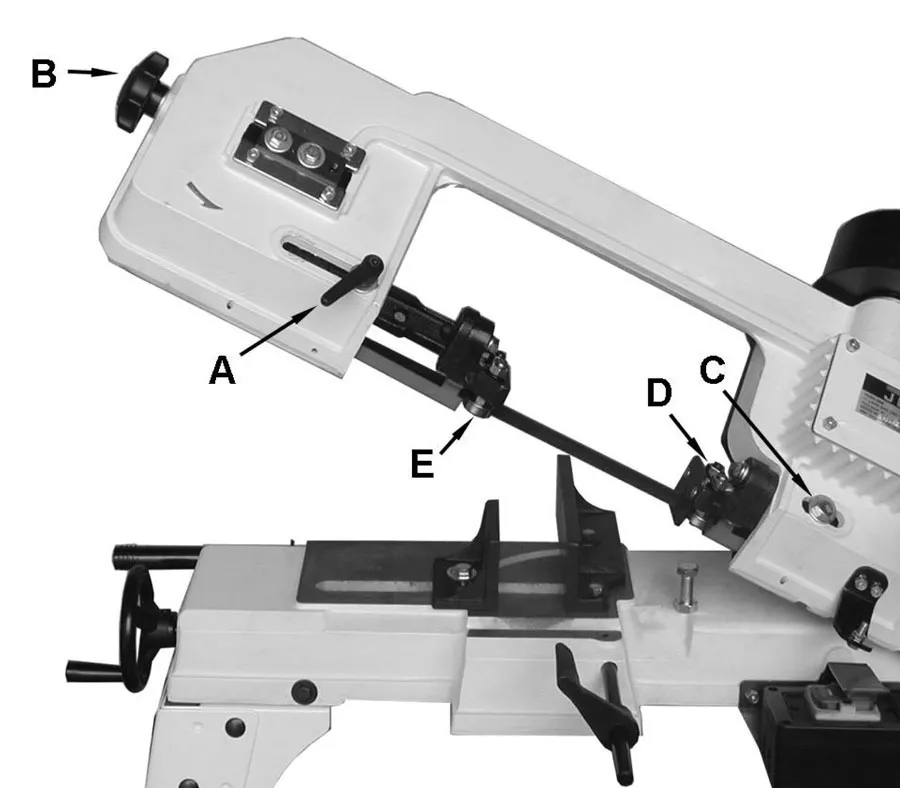
The blade guides (D) and (E) have two side rollers to control sideways movement of the blade and a roller that supports the back of the blade so that the pressure of cutting will not deflect the blade from the workpiece during the cut.
The side rollers can be adjusted to increase or decrease the pressure they put on the blade to keep the blade twisted at the correct angle and under enough tension while cutting.
In addition to individual roller adjustments, the entire blade guide assembly can also be adjusted in three dimensions, towards and away from the workpiece, using the adjustment lever (A) and locking bolt (C) to set the position, as well as height adjustments and sideways adjustments to keep the blade tracking smoothly as it cuts.
The first thing we want to do before we move onto adjustment of the blade guides on your metal cutting bandsaw is to check that the blade tracking is correct and the blade is set in a stable and correctly aligned position on the drive wheels.
Checking Drive Wheel Blade Tracking
- Remove The Blade Guide Assemblies
- Check Blade Positioning
- Listen For Noise
- Know The Correct Blade Alignment
Remove The Blade Guide Assemblies
The first step in tuning your bandsaw is to remove the blade guide assemblies without adjusting the blade tension. Refer to your metal cutting bandsaw manual to see how you remove the blade guides. You may be able to simply remove the guide head, or you may find it easier to remove the entire assembly.
Check Blade Positioning
Once the blade guide assemblies are removed you can check to see how smoothly and accurately the metal cutting bandsaw blade is running around the drive wheels when it is not cutting. You need to take special care when carrying out this check as you need to do it with the safety cover open or removed, and the moving parts exposed.
Open or remove the cover on the upper arm. Ensure that you are positioned at a safe distance from the blade, pulleys, wheels and drive bands and start the bandsaw. Watch the movement of the blade around the wheels and listen to how the bandsaw sounds. You are listening for any uneven sounds, scraping or knocking noises.
Listen For Noise
The sound your bandsaw makes when not under load indicates how well aligned the blade is. Scraping and squeaking noises indicate that the blade is rubbing on the edges of the drive wheels. It is quite normal to have some noise, this is because the drive wheels have a flange, or shoulder on the outer edge that keeps the blade from sliding off the back side of the wheel (the side away from the cutting edge). A perfectly adjusted blade will make very little noise.
Know The Correct Blade Alignment
If the tracking is adjusted correctly the back of the blade will be set very close to the flange, perhaps with a slight tendency to push against the flange. This ensures the blade cannot slide off the drive wheels. Ideally the blade should stay in position with a very small gap between the blade and the wheel flange.
Do You Need To Adjust Your Blade Tracking?
If you find when you are watching the blade movement and listening to it that the blade stays evenly in position on the drive wheels and makes no scraping noises then the blade is set correctly and you do not need to adjust it.
If the blade is very noisy it is an indication that the tracking is set too aggressively, and the blade is pushing hard against the wheel flange. This increases blade wear and makes it more likely the blade might break during cutting, so you will need to adjust it.
If you see the blade slowly working itself off the wheel, away from the wheel flange, then the tracking is set in the wrong direction. Turn off the bandsaw immediately. If the blade comes off the wheels it can cause injury. You will need to reposition the blade and adjust the tracking before restarting your metal cutting bandsaw.
How to Adjust Blade Tracking on a Metal Cutting Bandsaw
On the upper arm you will find the locking bolts for the drive wheels and the tracking adjustment bolts or set-screws that adjust the wheel alignment. Slacken the tension on the blade very slightly before starting to adjust the alignment, you do not want to be adjusting the wheel alignment against the tension of the blade.

On the RongFu RF-128 metal cutting bandsaw in the picture above, the blade tension is adjusted by turning the knob at the end of the upper arm. The locking bolt (A) and tracking adjustment set screw (B) are clearly visible, just above the adjustment lever for the blade guide position.
To correct the alignment, loosen the locking bolt slightly and then turn the alignment adjustment set-screw anti-clockwise until the noise of the blade rubbing on the retaining edge stops. Do not adjust the tension any further, and watch to check the blade is not now starting to move off the drive wheels, away from the wheel flange.
Normally only very slight adjustments are required, perhaps only a quarter turn of the set-screw. If the blade is noisy you can tell the correct direction to adjust the tension by listening to the sounds the blade makes. If you are going in the wrong direction the noise of the blade will increase.
If you find that the blade will not stay in a stable position with a gap between the blade and the wheel flange, then it will be necessary to adjust the blade so that it lightly touches the ledge while operating. On the RF-128, turning the adjustment screw clockwise moves the blade closer to the wheel flange. This will keep it on the wheels and ensure an even track for cutting.
Remember to tighten the locking bolt after you are finished, and tension the blade by turning the tension control knob. This should be tightened by hand. It does not need extreme force. Putting too much tension on the blade reduces its working life.
How Blade Guides Work
The purpose of the blade guides is to twist the blade into the correct alignment for cutting and support the back and side of the blades while cutting. Ideally the blade guides should be set so the path the blade follows between the two wheels is as straight as possible with no deflection of the blade, and the blade running very close to the rear guide but not pressed hard against it.
Adjusting Blade Guides
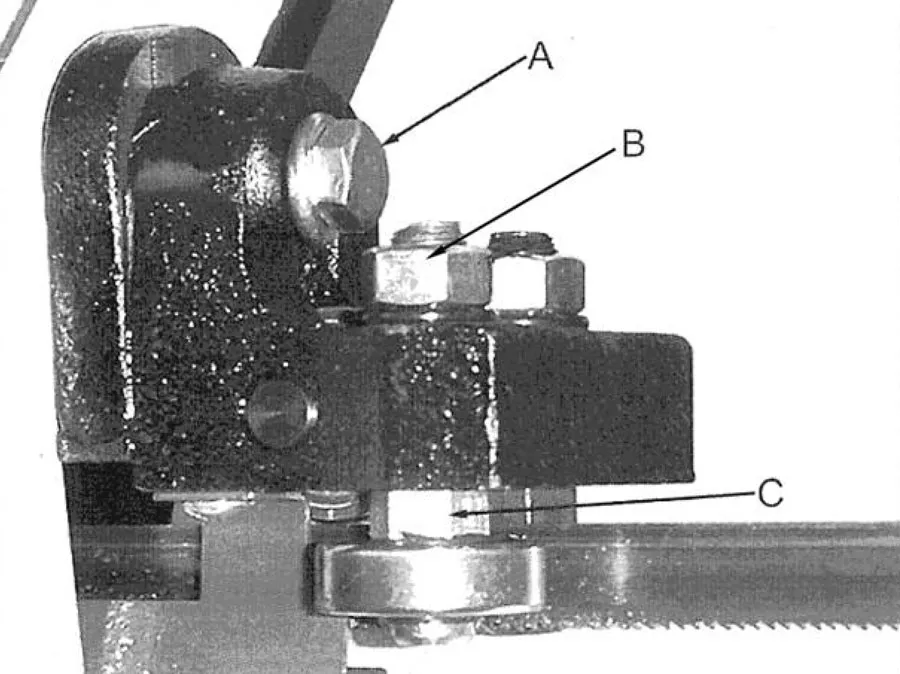
The blade guides may need to be slightly retracted before putting them back in position. You will often find only one side of the guide can be adjusted, and the other is fixed in position. Loosen the locking nut (B) on the adjustable side and turn the eccentric bearing mounting shaft (C) slightly to separate the bearings on both the upper and lower guides.
To adjust the gap between the rear guide roller bearing and the blade, slacken the adjustment bolt (A) and move the guide until there is a very small gap between the blade and the roller (approximately 0.1mm).
Positioning The Blade Guides
If set perfectly, the blade guides twist the blade so that it stays vertically aligned in the cut and maintain enough tension on the blade to minimize vibration. The blade guides need to be positioned so they twist the blade without pushing it out of line. The rear rollers should lightly touch the blade when properly adjusted.
To get the blade guides into the right position, you will need to slacken off the mounting bolts to enable you to make coarse adjustments until the blade is in the straightest alignment possible. Your first priority is to position the guides so they are not pushing the blade out of alignment. They should be twisting the blade, but not moving it to one side or the other.
Once the blade guides are set with the blade making a straight line between the two drive wheels, you can lock them off and move on to adjusting the twist of the blade. The blade guides can be rotated to adjust twist. You need to ensure the blade is completely vertical when it is cutting through your workpiece, so adjusting the twist is essential for clean and accurate cuts.
Adjust the bearing guides until they are in contact with the blade. You will be fine tuning these in a later step. With the arm or your metal cutting bandsaw at the fully lowered position, place a metal ruler flat against the blade after it has passed through the blade guides. It will be immediately obvious if the blade is not vertical, and also if there is any additional twist between the blade guides.
Rotate the blade guides to make the blade as vertical as possible then lock the guides in that position. Ideally you now have a metal cutting bandsaw blade that follows a straight line between the drive wheels. Now you will need to adjust the bearing guides for fine tuning.
Adjusting The Bearing Guides
To ensure the bearing guides are properly adjusted, you need to start by having the bearings touching the blade, this will keep the blade straight and give you the most accurate cuts. Loosen the locking nut on the adjustable side and turn the eccentric bearing mounting shaft slightly to separate the bearings on both the upper and lower guides.
Adjust the eccentric shaft so the bearing fully touches the blade and then tighten the locking nut. You will have the setting correct when the bearing is touching but you are still able to turn the bearing with your fingers without the blade moving as well.
When the metal cutting bandsaw is running, you will know if the bearing guide adjustment is too tight because you will be able to hear the sound of the join in the blade as it goes through the guide, and you will see the blade jump as it does this.
If this happens then you need to stop the bandsaw and back off the adjustment slightly until the noise disappears and the blade no longer jumps as the join passes between the bearing guides.
Making Square Cuts
Now you have your blade guides and alignment tuned, you need to check how square the blade is against the vice, and rotate the vice slightly if necessary. You can use a set square for this by placing it in the vice and lining it up with the blade, or any known square object that will fit in the vice and can be used as a reference point to line up with the blade.
At this stage you may find that you need to go back and readjust the vertical rotation of the blade guides as well as the angle at which the vice is set until these are squared off against each other without changing the path the blade follows.
Your Tuned Metal Cutting Bandsaw Is Now Ready For Work
Make a final check of all alignments including a visual inspection of the blade pathway. Remember you need to ensure the path the blade follows between the rollers is as straight as possible, but also adjust for rotation of the blade guides until the blade is completely vertical in relation to the cuts you intend to make.
Further Information
This article has given an overview of how to tune your metal cutting bandsaw, and to familiarize you with the steps required. We recommend you read your metal cutting bandsaw manual carefully before attempting any adjustments. Most bandsaws follow similar procedures, but refer to your owners manual to check the exact steps required.